Unlocking the OpenMesh A62 and flashing OpenWRT
Overview
A friend of mine saved a bunch of OpenMesh AP62 Wi-Fi Access points from the rubbish.
These units are re-branded as Datto AP62.
They are sold as part of a cloud managed solution, sadly this means you can't do anything with them unless you subscribe to their cloud service. Assuming it's still running.
Let's assume you have no access to anything but the hardware and the end goal is to get OpenWRT running. We know the device runs a modified version of OpenWRT and that OpenWRT has builds for this device.
As part of the devices' security, it checks any updates it will receive and verifies them via a OpenSSL(x509) certificate. This is where our issue starts, we have no way to sign an update for this unit, therefore we can't easily flash OpenWRT onto it...
If you want to skip to exactly how, then go directly to the Flashing OpenWRT section.
Open it up...
First thing I do for most hardware I receive is open the device and check for a serial / UART header.
If we can find one, it might be an easy way into the device, or you can learn about how the device boots by watching the lower level boot process.
Found it...
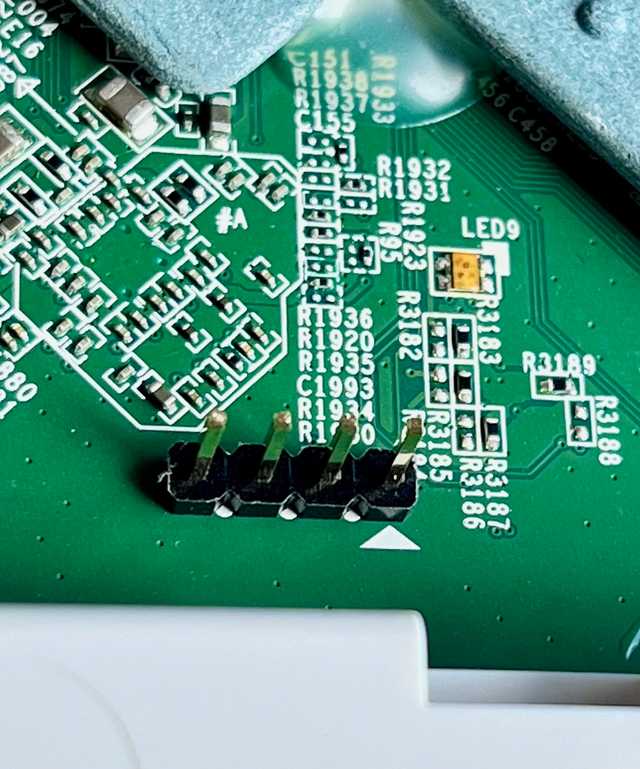
Pin-out is:
The small arrow points to the 3.3v pin.
3.3v, GND, RX, TX.
Serial settings are 115200,8,n,1.
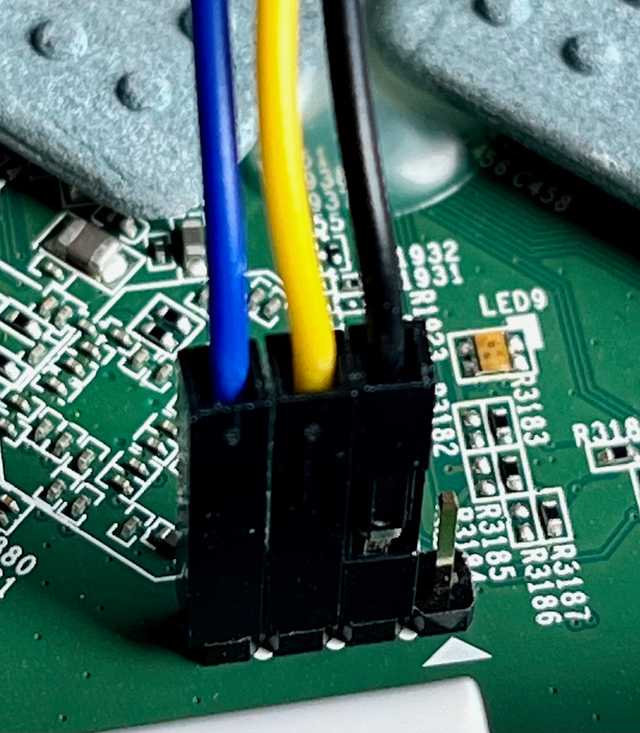
Connecting via serial
I use Minicom and a simple prolific Pl2303 USB to serial adaptor to connect to the header.
Now that we can watch it boot, we can see that it defaults tries to update via TFTP on boot.
Using eth0 device
TFTP from server 192.168.100.8; our IP address is 192.168.100.9
Filename 'fwupgrade.cfg'.
Load address: 0x84000000
Loading: *
ARP Retry count exceeded; starting again
T Retry count exceeded!
SF: Detected W25Q256 with page size 64 KiB, total 32 MiB
Validating MD5Sum of 'vmlinux'...
Expected since this is what the ap51 flashing project takes advantage of for some OpenMesh routers that are not locked down.
As expected, the U-Boot shell is disabled as a security measure, U-boot shell is disabled for this device. So we cannot simply enter U-boot and run arbitrary commands via the serial interface.
Okay, so that has not got us any closer to our goal yet.
The next thing I will look for is the flash chip, we can then possibly dump the firmware for offline inspection and looking for hints. They can also be used to glitch the device.
Lastly I would be looking at JTAG, but that is out of scope for now.
Thankfully, the flash is easy to spot I spot a W25Q family of SPI flash chips.
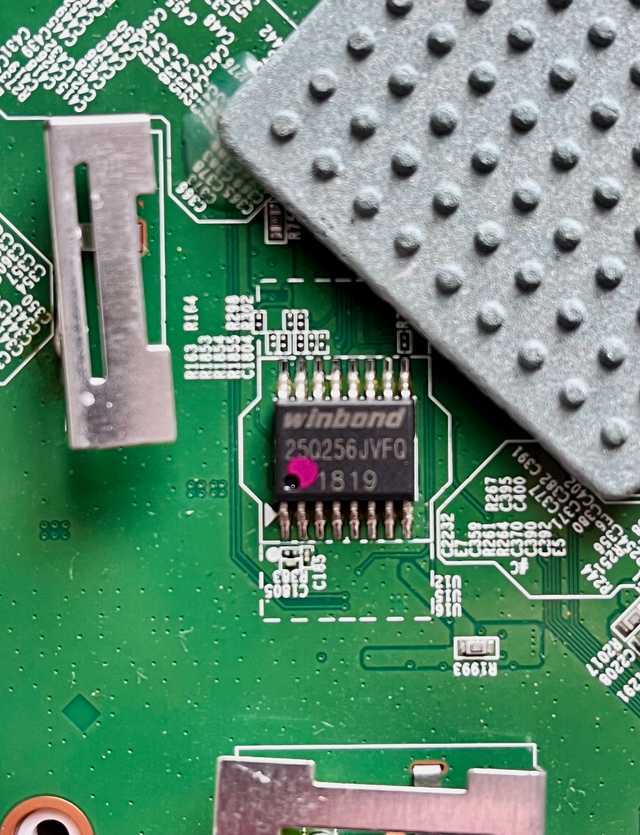
Dumping the flash
I have two main ways to dump the flash, first via an external reader or if I cannot get access to the pins or traces, see if we can gain access to U-Boot and use md to read back the device memory
into a file via Minicom. I much prefer the external reader, quicker and easier.
Since this is an SPI chip, I use a Raspberry Pi Pico flashed with serprog.
I use micro grabbers to connect to the pins:
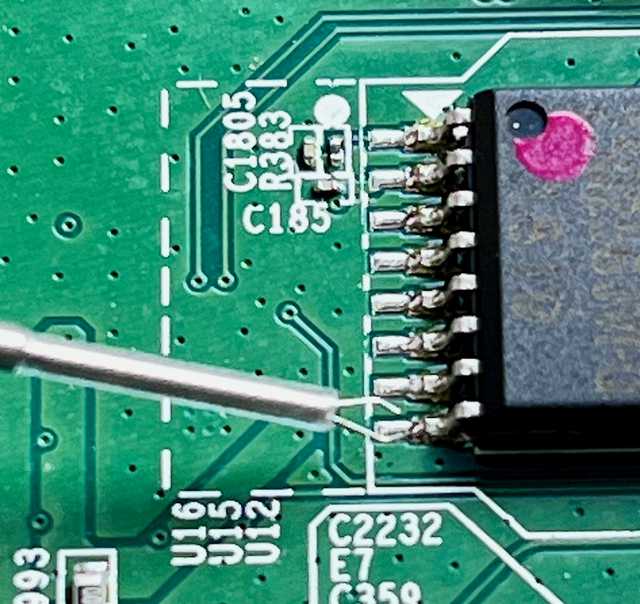
Ready to dump the flash:
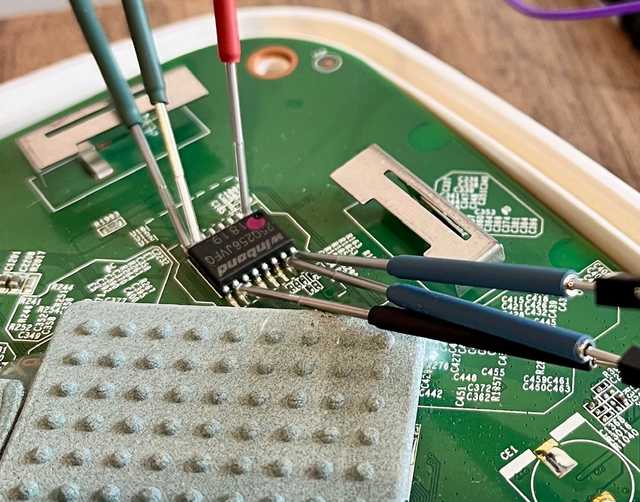
We know the device is part of the W25Q256JV. Looking at the data sheet for the device, we can connect to the required SPI pins and dump the flash via:
flashrom -p serprog:dev=/dev/ttyACM0,spispeed=32M -c W25Q256JV_Q -r ap62-flash-1.binI like to do this three times and compare the checksum of each dump via sha256sum to ensure we have a valid dump.
Once we have a valid dump of the flash, we can use binwalk to inspect the image.
Two things of interest stand out.
We can see the certificate chains used for verification:
1333309       0x14583D        Certificate in DER format (x509 v3), header length: 4, sequence length: 1284
1333421       0x1458AD        Certificate in DER format (x509 v3), header length: 4, sequence length: 1288
1333857       0x145A61        Certificate in DER format (x509 v3), header length: 4, sequence length: 1284
There are also entries for the Flattened device tree tables:
1572864       0x180000        Flattened device tree, size: 3821416 bytes, version: 17
1703936       0x1A0000        Flattened device tree, size: 2029288 bytes, version: 17
3699064       0x387178        Flattened device tree, size: 33353 bytes, version: 17
17629184      0x10D0000       Flattened device tree, size: 2029288 bytes, version: 17
19624312      0x12B7178       Flattened device tree, size: 33353 bytes, version: 17
You can extract the device tree's and inspect them, as an example:
dd if=ap62-flash-1.bin of=device-tree2.dtb bs=1 skip=1703936 count=2029288There is more to explore here, but I think there is an easier way in.
Let's run strings over the firmware image and search for preboot since this is how U-Boot sets up early commands like the TFTP flash process we saw before.
# strings ap62-flash-1.bin | grep preboot
bootcmd=test -n "${preboot}" && run preboot; test -n "${bootseq}" || bootseq=1,2; run set_bootargs_1; run set_bootargs_2; boot "${bootseq}"
preboot=flashit 0x84000000 fwupgrade.cfg
preboot=flashit 0x84000000 fwupgrade.cfg
bootcmd=test -n "${preboot}" && run preboot; test -n "${bootseq}" || bootseq=1,2; run set_bootargs_1; run set_bootargs_2; boot "${bootseq}"
Okay, so we know preboot now calls a custom function called flashit when the device starts up.
Let's see if we can find out what that function does.
The flashit function call
OpenMesh released the source code for some of their devices that make use of U-Boot. It's not the same as the AP62, but it's around the same time frame.
Taking a look though this code base for anything signature based, I find the following: function that gets called by the flashit function. This is what the TFTP bootloader calls:
bool validate_usign_block_signatures(const void *b, long len)int do_flashit (cmd_tbl_t *cmdtp, int flag, int argc, char *argv[])The following function makes note of some interesting assumptions:
static int validate_cfg_signature(const char *cfg_name, ulong dataaddr, int datasize)WARNING it is assumed that pub is validated and memory mapped flash
Looking over the above functions, we might be able to glitch this device.
Some of you may know the pin2pwn presentation from Defcon-24. In summary, this presentation explains how you can glitch/fault injection on embedded devices with SPI flash.
So we might be able to use this process to bypass or glitch out the signature checks. This method also works for other OpenMesh routers, it's not something I have discovered.
This sounds much easier than deconstructing the dumped flash image.
Glitching the flash
The pwn2pin presentation lists two key moments when fault injection might be useful:
- When U-boot loads the kernel
- When the Linux kernel hands over to the
initprocess
We know that U-boot asks for the signature file BEFORE it executes any file loaded via TFTP.
What happens if we try to glitch the flash, and how?
W25Q256 SPI flash
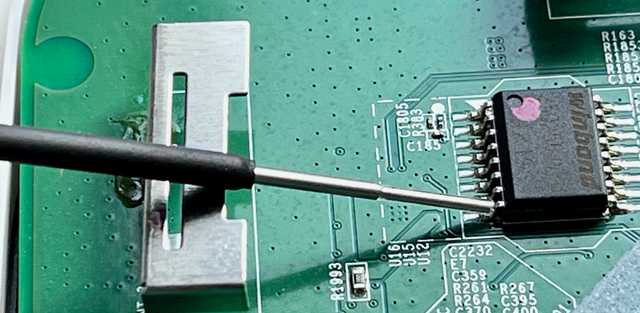
The most common pin used to inject faults is the Data Output(DO), this is pin 8 on our SOIC chip.
To inject this type of fault, we want to ground pin 8 at the correct moment. This moment is before the device tries to fetch the signature file, but not before U-boot has finished relocating itself to RAM.
Hardware setup
I use some micro pin grabbers to attach a wire to Pin 8. I have an extra wire running from the serial headers ground pin as well to give me an easy-to-use ground point.
You could find a ground pin/pad on the main-board, but I find this easier and more reliable assuming it's not super sensitive to timing.
Micro Grabber on Pin 8.
Software setup
Download / git clone the ap51-flash project. Run make and you should end up with an ap51-flash binary.
Given my laptop has multiple network interfaces, I like to specify the interface alongside the image to flash.
# ./ap51-flash enp0s13f0u1 openwrt-23.05.4-ipq40xx-generic-openmesh_a62-squashfs-factory.binWhere enp0s13f0u1 is the network interface connected to "Ethernet 2" on the AP62 device and openwrt-23.05.4-ipq40xx-generic-openmesh_a62-squashfs-factory.bin is the OpenWRT image I would like to flash to the device.
Let's give ap51-flash a try anyway to see what happens / where it fails...
[MAC ADDRESS]: device type 'A62' detected
[MAC ADDRESS]: A62: tftp client asks for 'fwupgrade.cfg', serving fwupgrade.cfg portion of: openwrt-23.05.4-ipq40xx-generic-openmesh_a62-squashfs-factory.bin (2 blocks) ...
[MAC ADDRESS]: A62: tftp client asks for 'fwupgrade.cfg.sig' - file not found ...
As expected, the device asks the TFTP server for a .sig file, if none is found the device tries up to three times before booting off the internal flash.
When to glitch?
When the device turns on, U-BOOT is loaded from flash, then relocates itself to RAM. So if we try to fault the SPI chip too early, U-Boot will not proceed.
When the device first boots, we need to ensure U-Boot can detect the flash.
U-Boot A62-ge2c3709 [Chaos Calmer 15.05.1,r35193] (Jan 15 2018 - 12:01:05)

smem ram ptable found: ver: 1 len: 3
DRAM:  256 MiB
machid : 0x8010001
NAND:  SF: Detected W25Q256 with page size 64 KiB, total 32 MiB
ipq_spi: page_size: 0x100, sector_size: 0x10000, size: 0x2000000
32 MiB
MMC:
If you don't see the above when trying this, then you have tried to glitch the flash too early on.
I found the ideal time to glitch the flash was at the end of the autoboot countdown:
ipq40xx_ess_sw_init done
eth0
Hit any key to stop autoboot:  0
eth0 PHY0 Down Speed :10 Half duplex
You will see "Hit any key to stop autoboot:" counting down from 8 to 0. Ground pin 8 when you see the counter reach 2, a little earlier or later won't matter as long as the device is still counting down.
This is right before the flashit / preboot functions are executed. By this stage the SPI flash has been initialized and mapped as part of the early boot process. Hence the assumptions in the function validate_cfg_signature, this is the part we aim to glitch.
As you can see the flashit function skips right over asking for the .sig file now:
U-Boot A62-ge2c3709 [Chaos Calmer 15.05.1,r35193] (Jan 15 2018 - 12:01:05)

smem ram ptable found: ver: 1 len: 3
DRAM:  256 MiB
machid : 0x8010001
NAND:  SF: Detected W25Q256 with page size 64 KiB, total 32 MiB
ipq_spi: page_size: 0x100, sector_size: 0x10000, size: 0x2000000
32 MiB
MMC:
PCI0 Link Intialized
In:    serial
Out:   serial
Err:   serial
machid: 8010001
flash_type: 0
Net:
A62 PHY reset, change to gpio 42
PHY ID1: 0x4d
PHY ID2: 0xd0b2
ipq40xx_ess_sw_init done
eth0
Hit any key to stop autoboot:  0
eth0 PHY0 Down Speed :10 Half duplex
eth0 PHY1 Down Speed :10 Half duplex
eth0 PHY2 Down Speed :10 Half duplex
eth0 PHY3 up Speed :1000 Full duplex
eth0 PHY4 up Speed :1000 Full duplex
Using eth0 device
TFTP from server 192.168.100.8; our IP address is 192.168.100.9
Filename 'fwupgrade.cfg'.
Load address: 0x84000000
Loading: #
done
Bytes transferred = 658 (292 hex)
SF NAND unsupported id:0:0:0:0SF NAND unsupported id:0:0:0:0SF: Unsupported manufacturer 00
Failed to initialize SPI flash at 0:0
eth0 PHY0 Down Speed :10 Half duplex
eth0 PHY1 Down Speed :10 Half duplex
eth0 PHY2 Down Speed :10 Half duplex
eth0 PHY3 up Speed :1000 Full duplex
eth0 PHY4 up Speed :1000 Full duplex
Using eth0 device
TFTP from server 192.168.100.8; our IP address is 192.168.100.9
Filename 'kernel'.
Load address: 0x84000293
Loading: #################################################################
         ##############################
done
Very nice, with signature checks bypassed we can flash OpenWRT.
What happens if we leave Pin 8 grounded the entire time?
U-Boot shell access
A lot of embedded devices tend to "fail open", so if we leave Pin 8 grounded, the device will be unable to write the firmware, let's see what happens next.
If you left pin 8 grounded the whole time, the code responsible for initialising the SPI flash will eventually give up and fall back to an unlocked U-Boot prompt. Nice! Now we have access to the U-Boot shell:
done
Bytes transferred = 4456452 (440004 hex)
SF NAND unsupported id:0:0:0:0SF NAND unsupported id:0:0:0:0SF: Unsupported manufacturer 00
Failed to initialize SPI flash at 0:0
SF NAND unsupported id:0:0:0:0SF NAND unsupported id:0:0:0:0SF: Unsupported manufacturer 00
Failed to initialize SPI flash at 0:0
SF NAND unsupported id:0:0:0:0SF NAND unsupported id:0:0:0:0SF: Unsupported manufacturer 00
Failed to initialize SPI flash at 0:0
SF NAND unsupported id:0:0:0:0SF NAND unsupported id:0:0:0:0SF: Unsupported manufacturer 00
Failed to initialize SPI flash at 0:0
(IPQ40xx) #

(IPQ40xx) # version

U-Boot A62-ge2c3709 [Chaos Calmer 15.05.1,r35193] (Jan 15 2018 - 12:01:05)
arm-linux-gnueabi-gcc (Debian 6.3.0-18) 6.3.0 20170516
GNU ld (GNU Binutils for Debian) 2.28
(IPQ40xx) #
Given we now understand how and when to glitch and as a bonus got access to U-boot, let's move on to flashing the device with OpenWRT.
Flashing OpenWRT
The way I found easiest to flash the devices is with the following configuration:
- Correct "Ethernet 2" port to your machine directly
- Connect "Ethernet 1" port to a POE switch / power source (Leave this disconnected for now)
- Connect the serial console to your machine (I like to use Minicom)
- Attach a pin grabber to pin 8 on the SPI flash
- Have an easy-to-use ground point. (I use the serial headers ground pin)
- Start up the
ap51-flashtool and set the interface name that is connected to Ethernet 2 and the OpenWRT image to flash
I like to set up two terminals running side by side, one with Minicom and the other with ap51-flash running. This makes it easy to know when to glitch and if it worked correctly.
Once you see the autoboot count down on the serial console, ground pin 8. Once you see the second TFTP transfer start, make sure you STOP grounding pin 8, otherwise you won't be able to write the firmware the device just downloaded. Remove the ground when you see:
Filename 'rootfs'.
Load address: 0x84300293
This is what a successful glitch and flash looks like via the serial console:
Hit any key to stop autoboot:  0
eth0 PHY0 Down Speed :10 Half duplex
eth0 PHY1 Down Speed :10 Half duplex
eth0 PHY2 Down Speed :10 Half duplex
eth0 PHY3 up Speed :1000 Full duplex
eth0 PHY4 up Speed :1000 Full duplex
Using eth0 device
TFTP from server 192.168.100.8; our IP address is 192.168.100.9
Filename 'fwupgrade.cfg'.
Load address: 0x84000000
Loading: #
done
Bytes transferred = 658 (292 hex)
SF NAND unsupported id:0:0:0:0SF NAND unsupported id:0:0:0:0SF: Unsupported manufacturer 00
Failed to initialize SPI flash at 0:0
eth0 PHY0 Down Speed :10 Half duplex
eth0 PHY1 Down Speed :10 Half duplex
eth0 PHY2 Down Speed :10 Half duplex
eth0 PHY3 up Speed :1000 Full duplex
eth0 PHY4 up Speed :1000 Full duplex
Using eth0 device
TFTP from server 192.168.100.8; our IP address is 192.168.100.9
Filename 'kernel'.
Load address: 0x84000293
Loading: #################################################################
         #################################################################
         ##############################
done
Bytes transferred = 3145728 (300000 hex)
eth0 PHY0 Down Speed :10 Half duplex
eth0 PHY1 Down Speed :10 Half duplex
eth0 PHY2 Down Speed :10 Half duplex
eth0 PHY3 up Speed :1000 Full duplex
eth0 PHY4 up Speed :1000 Full duplex
Using eth0 device
TFTP from server 192.168.100.8; our IP address is 192.168.100.9
Filename 'rootfs'.
Load address: 0x84300293
Loading: #################################################################
         #################################################################
         ##########################
done
Bytes transferred = 4456452 (440004 hex)
SF: Detected W25Q256 with page size 64 KiB, total 32 MiB
SF: Detected W25Q256 with page size 64 KiB, total 32 MiB
SF: Detected W25Q256 with page size 64 KiB, total 32 MiB
SF: Detected W25Q256 with page size 64 KiB, total 32 MiB
Saving Environment to NAND...
Erasing Nand...
Erasing at 0xe0000 -- 100% complete.
Writing to Nand... done
SF: Detected W25Q256 with page size 64 KiB, total 32 MiB
Validating MD5Sum of 'vmlinux'...
SF: Detected W25Q256 with page size 64 KiB, total 32 MiB
Passed!
Validating MD5Sum of 'rootfs'...
SF: Detected W25Q256 with page size 64 KiB, total 32 MiB
Passed!
SF: Detected W25Q256 with page size 64 KiB, total 32 MiB
## Booting kernel from FIT Image at 84000000 ..
Once you see Booting kernel from FIT Image at 84000000 .. the device will then start booting into the OpenWRT kernel and image.
If you got the timing, correct you should see the following output from the ap51-flash tool:
# ./ap51-flash enp0s13f0u1 openwrt-23.05.4-ipq40xx-generic-openmesh_a62-squashfs-factory.bin
[MAC ADDRESS]: device type 'A62' detected
[MAC ADDRESS]: A62: tftp client asks for 'fwupgrade.cfg', serving fwupgrade.cfg portion of: openwrt-23.05.4-ipq40xx-generic-openmesh_a62-squashfs-factory.bin (2 blocks) ...
[MAC ADDRESS]: A62: tftp client asks for 'kernel', serving kernel portion of: openwrt-23.05.4-ipq40xx-generic-openmesh_a62-squashfs-factory.bin (6144 blocks) ...
[MAC ADDRESS]: A62: tftp client asks for 'rootfs', serving rootfs portion of: openwrt-23.05.4-ipq40xx-generic-openmesh_a62-squashfs-factory.bin (8705 blocks) ...
[MAC ADDRESS]: A62: image successfully transmitted - writing image to flash ...
[MAC ADDRESS]: A62: flash complete. Device ready to unplug.
Success!
You now have OpenWRT running. You can also upgrade the device in the future via the web console, no need to open the device ever again.
Starting kernel ...

[    0.000000] Booting Linux on physical CPU 0x0
[    0.000000] Linux version 5.15.162 (builder@buildhost) (arm-openwrt-linux-muslgnueabi-gcc (OpenWrt GCC 12.3.0 r24012-d8dd03c46f) 12.3.04
[    0.000000] CPU: ARMv7 Processor [410fc075] revision 5 (ARMv7), cr=10c5387d
[    0.000000] CPU: div instructions available: patching division code
[    0.000000] CPU: PIPT / VIPT nonaliasing data cache, VIPT aliasing instruction cache
<< SNIP >>
BusyBox v1.36.1 (2024-07-15 22:14:18 UTC) built-in shell (ash)
_______ ________ __
| |.-----.-----.-----.| | | |.----.| |_
| - || _ | -__| || | | || _|| _|
|_______|| __|_____|__|__||________||__| |____|
|__| W I R E L E S S F R E E D O M
-----------------------------------------------------
OpenWrt 23.05.4, r24012-d8dd03c46f
-----------------------------------------------------
=== WARNING! =====================================
There is no root password defined on this device!
Use the "passwd" command to set up a new password
in order to prevent unauthorized SSH logins.
--------------------------------------------------
root@OpenWrt:/#Summary
This has been a simple introduction to fault injection, with the outcome of unlocking a still quite usable Wi-Fi access point. This method to inject faults via the SPI flash can be used on a range of devices. It can take time to understand when you need to inject a fault or what the outcome is.
Understand the devices default behaviour first, then target where you think a fault injection may help. Originally, I was aiming to get into the U-Boot shell and flash via TFTP, but a more effective way to reach the outcome was actually to bypass the signature checks by introduction of a fault at that point.
